
Welcome!
Be part of our community & join our international next generation forum now!
Categories
In this Discussion
- brewsmith February 2015
- FloridaCracker February 2015
- grim February 2015
- JettFuel March 2015
- Kapea March 2015
- Lloyd February 2015
- punkin March 2015
- Sadi February 2015
- starkid101 March 2015
- TheMechWarrior February 2015
Comments
Hmmm...it went sideways. Oops forgot to resize, all good now.
I thought it would be nice to give it a polish.
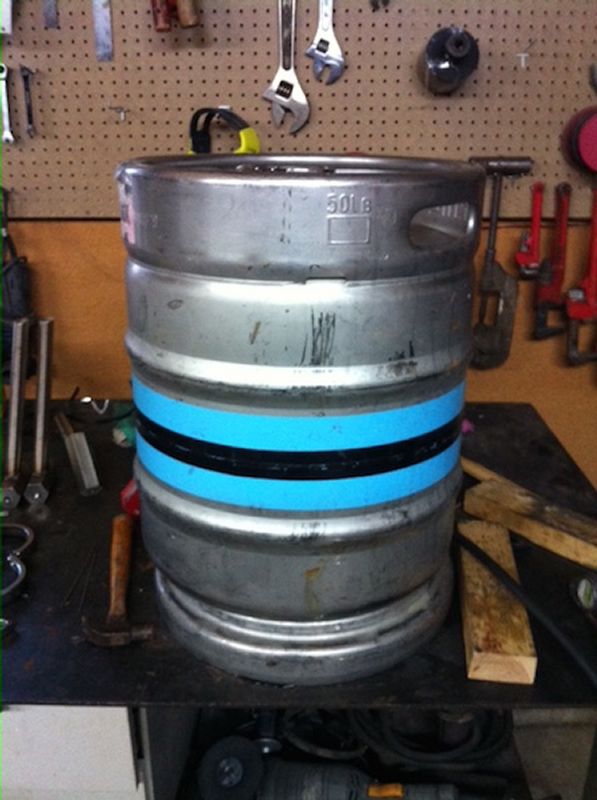
Element Ferrule in.
Column, fill and sight glass ferrules in.
Fuck that's shiny.
StillDragon Australia & New Zealand - Your StillDragon® Distributor for Australia & New Zealand
wow nice job
Mind sharing your polishing technique and how long it took? Very well done indeed!
The Polishing was very easy and fast, I used 2 products. I used the Gator fine 4.5" finishing disc on a angle grinder 45-60 min for the keg. Then I used Autosol Metal polish with a 7" lambswool buffer at mid speed. I went through about a tube and a half of the polish for the whole keg. I would say it took me another 1-1.5 hours in polishing. The result is pretty good you can see hazing still in some of the keg but for a few hours I would have no issues on doing again.
Great job :-bd
If you plan on having a drain, and I recommend that you do, flip the keg 90 degrees from the picture and have the top of the keg be on the bottom. Cut the "ring" off of what now is the top. This will give you access to the entire top. Figure out what the largest diameter still that you will use and use that size ferrule for the main opening. I also added a 3" sight glass on the top. This is very helpful to me as I can tell how the boil is going (gonna puke, not gonna puke). If you are in a part of the world where you can access the power, use a 5,500 Ultra low watt element. Use 2 if you want a quick heatup. Beats gas all day long and a LOT more controllable.
Bling! Had to shield my eyes from the glare when looking at the pictures.
Very nice job.
@FloridaCracker I did think of that, I just flipped the keg and will use the 2" Sankey for the drain. I welded a 6" ferrel for my column and it will be reduced to 4", I did this for easy cleaning. I will be powering with a 6000 watt element and a 120 volt 2000 watt for quick start ups. Cheers JettFuel
Well just got in from the last welds on the boiler.
A quick Mock Up!! :))
Thank you for all the comments, I am going to need a lot of help to figure this bad boy out! :D
Wait a minute, I've seen this picture before!
Buzz Aldrin would approve!
Damn fine polishing job! I would like to do that to my sanke keg boiler, but I have to keep it unmodified so it can hide in plain sight in my brewery.
I'm more like I am now than I was before.
Lovely work mate, you've created quite the family heirloom
Looks great. My previous comments were typed but not entered before I saw the bulk of your pictures. Your welding guy is obviously a LOT better than mine.
@FloridaCracker thank you for the compliment on the welds this has been a fun project for me and has been crafted all in house by yours truly.
To funny, I do have to admit I did use some of those pictures for ideas.
I found this 4" section in a scrap yard and paid $4.00 for it. I was thinking of using it for a packed section. It is 130mm long would this be big enough for a reflux tower?
I was thinking of adding a CIP to my set up, does anyone have any suggestions to do this?
Find a TC thru-wall mini sprayball and weld a mating triclamp ferrule to the top of the boiler. Usually they are 1.5" or 2" TC.
Otherwise if you can get a line on a cheap sprayball, just fab it into a 2" TC endcap. with whatever mating you need.
Maybe the SD team has something in the works?
@grim Would I do that on the top of the 180 bend so that both sides would get watered?
For the column, just add a port at the top so you can flood.
CIP/Sprayball is more critical for the boiler, since you can't clean that in a sink.
For CIP just replace the top reducer with a tordedo. Use a 2"x3/4 or 1" end cap and a ball valve. If you get the torpedo with the thermowell you get two uses from the one fitting. You are handy enough to drill and weld a 2" ferrule on the reducer your self too.
Well, not to weld it on yourself, to weld it on the reducer by yourself.
StillDragon Australia & New Zealand - Your StillDragon® Distributor for Australia & New Zealand
I am about half way through a cleaning run on the Lunar and have a few questions? What is considered to have a flooded plate? When I run should I have the tops of the bubble caps visible? I know that a clean does not behave like a wash but I had very little loading on the first plate and could fill the second very easily. Is my vapour pressure to low? Building was the easy part!! Trying to figure this thing out will take many beers!!
I have the following temps do they seem right?
Boiler vapor 87.5, Dephag 91.5, Vapor 85.6 and PC 27.7, this produces a 3-5 drops per second at the parrot.
nice shiny thing JF..
My wife tells me I drink to much beer and spirit wen I stilling ..
Haha she is right ,but don't tell her :bz